App Review of StitchSketch LE. Designing Your Own Patterns Is Easier than Ever!

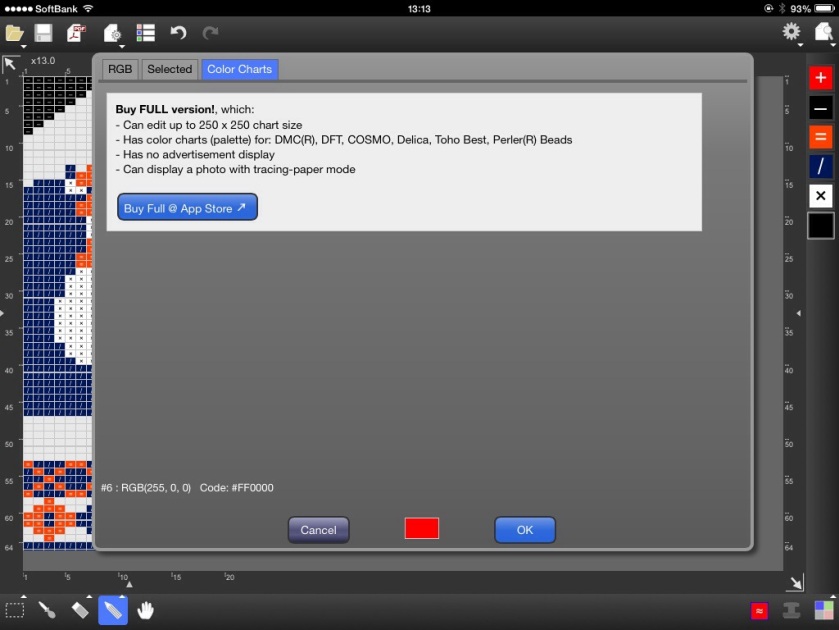
For today’s edition of Yarn Addiction Thursday, I’m reviewing With StitchSketch LE. You can create your own knit, cross-stitch, beadwork designs, or pixel art on your iPad or iPhone with ease.

In the past, if you wanted to design a knitting pattern, you  needed graph paper or to draw out your pattern. Each block got its own color, just like pixel art. If you were doing it freehand, no worries. A photo was a lot tougher.  It was tough to copy a photo onto graph paper, so you could use a light table or transparancy. Not convenient but doable.

So all is good, until you knit out your design and find that the gauge of your yarn makes a unit block of the design more rectangular than square. Your end result ends up looking stretched if the stitch is more upright rectangular and squashed if the stitch was wider.

How to make sure your design doesn’t go wonky? One solution was to find knitting graph paper with different gauge. I didn’t even know that existed until recently. Or you could use an Excel spreadsheet to make your graph paper by adjusting the column and row sizes according to gauge. So all that work and you still need to get your image on the paper. Yikes.

StitchSketch LE makes things  a lot easier. Use your iPad or your iPhone to create wherever you are.

20141113-132835-48515356.jpg1. You select your medium (stitching, knitting, beading, pixel art) which will have symbols or colors depending on your choice.
2. Input the size of the work and the gauge of the yarn
3. Create your image. Draw in the app or import.


4. Save the work
You can save work in the app gallery, your camera roll or generate a PDF. Outside the app gallery, saving as a PDF gets you the maximum amount of information. Saving to your camera roll gets you a chart but no row counts or color info.
20141113-132834-48514796.jpg
5. Generate a PDF.
Check your settings carefully. You might save without the graph lines which makes it very difficult to use. But don’t close this PDF. You need to click the icon on the top right to move the generated PDF into another app to save it or send it. By doing this you get a file row counts and a list of colors in RGB and hexadecimal (for coding). If you buy the full app, you get color references for the brands they use.

I drew the image below in the app. I posted some versions using different media available in StitchSketchLE. I wonder if one could do pixel art for Minecraft in this app?

20141113-202951-73791129.jpg
Some examples of stitch symbols

For knitters who design with stitches more than color
There is also a selection for knitting symbols. I don’t do a lot of knitting with stitch symbols so I’m not familiar with the meanings and the effects. I played with the symbols to show some of them. I’m pretty sure this would not actually make anything.

Some tips
1. This is basically pixel art so the finer your gauge, the more refined your design will look.
2. Test knit a swatch and count your rows and stitches then enter: this way you can be sure your design doesn’t suffer from stretch or squashiness

Conclusion: 5 Stars
I really like the app on my iPad. It removes the grunt work (finding paper, creating a graph, transferring the image to paper) from making a design and allows you to focus on making your vision a reality. I downloaded the free version but haven’t upgraded to the full version. Currently, the LE version fills all my needs very well. I find $6.99 a bit spendy for the full version, but the tracing paper mode does entice me. If I did complicated color work or made kits for people, I would definitely get the full version so I could get a color list of manufacturers’ flosses or beads.

StitchSketch LE by Keiji Ikuta is a free app for the basic and $6.99 for full app.

20141113-132835-48515064.jpg

Yarn Addiction Thursday: Palla, my Finnish Owl.

A while ago on my Yarnspiration post, I posted about the Finnish wool I bought at Lanka Deli by Novita I had originally intended to make mittens but I have a multitude of mittens. What I didn’t have was a stuffed owl. I’m really inspired by the Estonian toy animals in Kiri Kari by Anu Raud and Anu Kotli. I couldn’t find a copy of the book to buy so used them as an inspiration.

I created using an app called StitchSketchLE (look for my review on that next week!). It’s not the most creative design but it was good for a test. I made some pieces that were ok. I find color stranded knitting really hard, especially when I add a third color.

owl_piecesI decided the test pieces would be a good base for my new owl. I originally wanted to just make a flat toy but I get caught up in the challenge of adding form to a design. I ended up adding side pieces and a bottom to give it more volume.  I picked up stitches from the ends and kept knitting from one end to form the tail and the base and the other to make the head.

I used double pointed needles to make the beak and the talons and needle felted the eyes.

And here is the end result:

20141031-124954-46194208.jpg

The Finnish word for owl is pöllö but umlauts are hard to type and plain pollo is Spanish for chicken–not the effect I’m going for. If I were to spell it the way I heard it on Google translate, I get Palla, so Palla it is. One of my friends asked me if there was a connection to Pallas Athena, so yay for coincidence.

Yarn Addiction Thursday: Baby Fish Slippers

fishslippers_05a
Fish Slippers

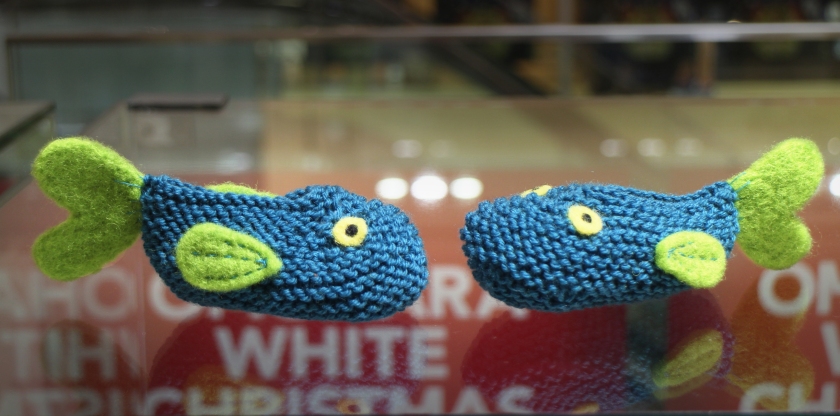
A friend had a baby and I decided to make some baby slippers. They knit up quickly and are fun to make. I use a pattern by La Droguerie (of course). The original pattern is for frogs but I didn’t have enough green left over to make two slippers. I had some nice blue so I decided I could convert the frog into fish by using some felting wool in a lime green. So not only a gift, but a stash-busting project!

I drew a quick sketch and then drew out a template for the fins. I needle felted the wool, traced the template on top, cut out the fins then finished the fin edges with the felting needle. I felted the wool with soap and water just to be sure. The eyes are felted, too. This way, I’m less worried about small parts that could end up in a baby’s mouth.

Each slipper took about an hour to knit and sew up. This was a project where it was actually fun to sew on the embellishments.

fishslippers_04
Materials:
La Droguerie Surnaturelle
Hamanaka felt wool

Yarn Addiction Thursday: More I-cord

view of whole scarfSince I found it so relaxing to make i-cord with the mill, I decided to make another scarf. It’s based on the same La Droguerie project. This time, instead of using pom poms, I sewed tiny beads between the cords to join the strands. I used old beads and pendants that I had left over from my abandoned attempts at jewelry making. The pompoms were fun, but I like this project, too. I feel like I’m wearing a piece of jewelry.

Knotted scarf detailing beaded joinsMostly I used stash wool, but I picked up some more at La Droguerie. Sigh… I’m such a wool addict. But at least 60% of the wool is from stuff I already had. I think this scarf is a lot more elegant than the pom-pom scarf. Using beads instead of pompoms is more subtle anyway. Another change I made was to sew the beads closer together than the pompoms so that the gaps between strings are smaller. As much as I enjoy making the cord, I’m starting to find the sewing up part tedious. This is a problem since I already made more i-cords for another scarf. I suppose it’s now a problem for later.

Scarf tip details
Scarf tip details

Another great stash-busting factor were the silver beads I used for the ends. I had to buy a few more blue beads, but I really tried to use up what I had. As a stash project, this worked out not too badly.  The finished product is a bit heavier so I was a bit worried my hard work was for naught. I hate even a slight pull around my neck so I was relieved to find that if I took a bit of care on how I wrapped it, I didn’t fell any pull.  

Materials
Wool
Cashmere 95%/nylon5%: Cashmere Gold by Rich More (stash)
Alpaca 100%: Alpaga Teint by La Droguerie (1/2 stash, 1/2 new
Silk 50%/alpaca 50%:  Soyeuse by La Droguerie (stash)
Merino: Daily by Okadaya (stash)
Notions
End Beads:
silver and moonstone, old single earrings or bought randomly over the years
Other Beads: La Droguerie and stash
Connecting Beads:  La Droguerie (new)

These Needles Will Take Your Knitting From Muggle to Magic

Gorgeous colors PLUS smoother knitting?
Gorgeous colors PLUS smoother knitting? Must be magic.

The most magical knitting needles were revealed to me at Gina Brown’s in Calgary.  The Symphonie Dreamz by Knitter’s Pryde are made of densified laminated birch, and have different colors for different sizes. The set of 10″ single pointed needles comes in a case and runs about $65 USD. I’m keeping these in mind for my birthday.

These needles remind me of wands from Olivander’s Wand shop in Harry Potter. At Olivander’s, wands are made of various woods to suit the wizard or witch. The fact that these needles come in various colors (according to size) and are made of a birch instead of bamboo make them special to me. It seems appropriate for knitting because making something out of yarn is really a kind of magic.

Mission Yarnpossible: Calgary

Since my European Yarnpossible missions, the wristwarmers,  and Argie I hadn’t made anything for months. From late March, I’d been working on a writing project and a photography project which took up all my time. In May I went to the Romantic Times Book Lovers’ Conference in New Orleans and visited my family in Canada. It was lots of work and lots of fun. But I was going into maker withdrawal. Making something from yarn is like a kind of meditation for me with the bonus that I have some product to show for my time. Still, I don’t live in Calgary anymore so I don’t know any knitting stores there.

My mom gave me five balls of Sirdar Denim Tweed DK that she found during a cleaning binge. I thought, “Hey great! Free yarn.” But then the yarn sat there, and it just begged to be made into something. But I don’t have a crochet hook. Then I think, “Hey! I could maybe buy some Noro books in English.” Remember that Phildar pattern I liked? Noro Love has a pattern called Aimee that is similar. I know you can order books online, but I’ve been burned too many times before on craft, crochet and knitting books. Just because the picture is great, doesn’t mean that the book is going to work for YOU. I need to hold that book in my hands and check all the patterns and the instructions before I spend my money.

Gina Brown’s
Happily, Gina Brown’s has a great Noro selection and a great selection of Noro pattern books. I also wanted to consult someone because I’d need to adapt it to make it longer and I need advice on the wool. The pattern calls for Kochoran, a wool that Noro discontinued. There is no substitute for talking to experienced staff at a knitting store when it comes to swapping out wool.

diamond_woolI promptly got the Noro Love book and then talked yarn with the staff. She recommended I try Malabrigo Chunky or Diamond alpaca wool.

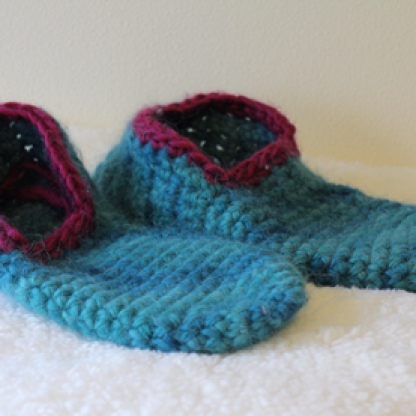
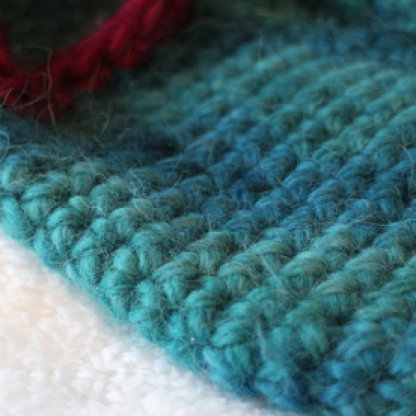
I loved the feel and colors of Diamond alpaca. I wasn’t sure about my tension, so I bought a ball to try it out. I knew right away I wasn’t going to be my sweater. It was soft, colorful, quick to knit but I forgot how much alpaca sheds. I gave up on the swatch but decided to use up the yarn by making a pair of slippers which would be far from my face in daily life. I took a look at some slipper patterns then decided to try my hand at making my own pattern. Luckily I used just under one ball, plus a contrasting trim to make up the slippers. It took about two days to make them, including start, restarts and shopping. Everything was great but the shedding! I was covered in blue hair. It looked like I was owned by a big blue dog.


Super warm, felted slippers from Estonia
Even super warm, felted slippers from Estonia are no match for chilly ceramic tiles

The idea to make slippers was no doubt was inspired by the glacial temperatures of the ceramic tiles on my parents’ floor. Even my super slippers Ratti and Ratto couldn’t protect me from chills. It turns out that my new alpaca slippers make great inserts for Ratti and Ratto. The extra layer of alpaca is like a massage for my feet.

While shopping at Gina Browns’ I nabbed a fun book, Monkey Around by Patons for knitting or crocheting various kinds of sock monkey toys and accessories. I promptly bought more wool to complement the my recently acquired denim tweed to make a sock monkey cosy. I post about the sock monkey cup holders in next week’s Yarn Addiction Thursday.

Gina Brown’s has lots of lovely fibers in some of my favorite brands, Malabrigo, Noro and Cascade. The staff was lovely and I got lots of great advice. They also showed me a pair of magical knitting needles. Check them out in an upcoming Yarn Addiction Thursday post.

5718 1A Street SW
Calgary, AB T2H 0E8
Phone number
(403) 255-2200
http://ginabrownsnews.blogspot.jp/

Pudding Yarn
I just happened on Pudding Yarn when I took my mom out for lunch on 17th Avenue. We parked the car and right outside was a yarn store I’d never heard of. It’s been there for a while, but I no longer live in Calgary I’m out of touch with shops. It was also perfect timing because I had just decided that the lime green cascade yarn I had for the sock monkey cup was a great contrast color for the slippers but the size just looked too awkward. My attempt at amore delicate edging failed miserably. The woman who worked at Pudding Yarn was helpful and the store has a lot of nice, luxurious yarns. I was able to get a really nice yarn (Phildar, coincidentally) in a lovely deep magenta to trim the slippers.

1516 6 St SW, Calgary AB T2R 0Z8
(403) 244-2996
http://www.puddingyarn.com

It’s interesting how my memory of yarn shops in Calgary has changed, or perhaps knitting in Canada has changed. When I was just starting to knit in high school, most of the patterns were Patons or Beehive with the occassional exotic French patterns. The yarn was ok, but not particularly amazing compared to the wonderful array of colors, textures and materials available today.

Mission Yarnpossible: Helsinki

So the next Yarnpossible mission in my European adventure was to find some yarn in Helsinki. Thank heavens for ex-pat sites and blogs. If you are travelling to a foreign country, I really recommend checking out some ex-pat sites. Knitmap.com was a great help. I spent a lot of time looking at this world-wide knitting store database. When searching for stores I discovered Riihivilla.com. Riihivilla sells through an online shop  and at Kauppatori Market in Helsinki. It is a family business which produces and dye their own wool and make gorgeous kits. I didn’t go but it is definitely worth mentioning because this shop really represents Finnish yarn and knitting to me.


On January 2nd, I went to Lanka Deli by Novita.  I enjoyed the shop but the women who worked there were polite, they weren’t as chatty as staff at other stores I’ve been to or other Finnish people I met. I think there was a language barrier.

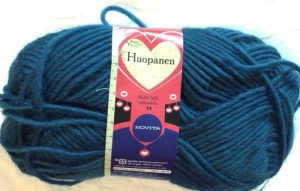
I found a felting wool which I later used to make my  felted iPhone case. The yarn is called Huopanen. It was interesting to work with a wool specifically for felting after knitting. It works up easily and I din’t have problems with splitting the yarn.

20140614-201345-72825533.jpg

I also bought some wool to make some mittens. Florica by Novita is a 5-ply sport weight. It seems similar to the craft-boutique wool I saw in Tallinn. It was a bit softer and I had a chance of ordering more if I liked it. My color choices were inspired by Marimekko designs and Italla tableware, and Dick Bruna’s Miffy. Bruna is one of my favorite illustrators.


Lanka Deli by Novita.
Malminrinne 1 B, Helsinki, Finland 00180 Finland
(09) 673 246

Mission Yarnpossible: Tallinn

Our trip to Tallinn was a complete surprise and totally unplanned. We read about the ferry from Helsinki to Tallinn in a brochure in our hotel room. The Old Town in Tallinn, Estonia is a UNESCO world heritage site for its architecture dating back to the 13th century. Since it was January 1st and almost everything in Helsinki was closed, we figured we might as well take the trip. It turns out that Old Town had lots of stores open and a Christmas Market in the Square. I was also keen to go because when I think of Estonia, I think of knitting

estonian_mitten
I made these 4 years ago and gave them to a friend.

I love multi-colored Estonian patterns. I’ve made a couple pairs of mittens using Scandanavian patterns. I discovered this through The Mitten Book: Traditional Patterns from Gotland, by Ingrid Gottfridson. My multi-colored knitting suffers from tension issues but I do it anyway. I’m sure there are differences in the colorwork knitting styles between Finland, Sweden and Estonia but I’m not clear what those might be. I was hopeful that I could find some yarn or some nice pieces to take home.

One of the first things I saw was a yarn-bombed bike in a window! Very encouraging! I love looking at yarn-bombed objects. How they do it is a mystery to me. One I intend to continue to enjoy as a mystery.

Yarn bomb that bike!

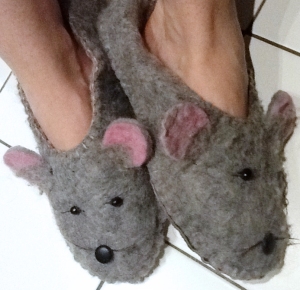
I found great looking at a couple of folk-art boutiques in Old Town. The yarn was really interesting but it was thin which means lots of work to knit; and coarse, which means really itchy-scratchy products. I can see how this wool would be great for blocking snow out, but I don’t like scratchy. But there are many wool-based souvenirs in Tallinn’s Old Town. My husband got a sweater, I bought a balaclava hat for a friend, and a pair felted mouse slippers for myself. The amount of felted work for sale was almost staggering.
Best Slippers Ever!


rattirattoI completely adore my mouse slippers. I call them Ratti and Ratto (sort of playing on the Finnish word for rat or mouse, even though they are Estonian). They were 20 euros which was on the cheap end for what was available. They have suede soles. The wool looks scratchy but the pink insides are very soft on the feet. The pink insides aren’t attached very well and one eye fell off on the first day. But they are still fun. I have plans to make Ratti a pi-rat by putting on a black eye patch in place of another eye.

Felting an iPhone Case

Estello's Felted Phone CaseThis felted iPhone cover is one of the things I made with the yarn I bought in Helsinki. Instead of the traditional souvenir, I thought I’d buy wool and make my own. I already made wrist-warmers from wool I bought from Lil Weasel in Paris. This wool is called Huopanen by Novita. I bought it at A store in Helsinki. It’s felting wool. It’s a super-bulky plied texture, suitable for 8-10 mm needlesIt was fairly easy to knit up but I wasn’t sure how it was going to felt and shrink.

It didn’t occur to me until yesterday to look Novita up on Ravelry. I learned that Huopanen has  about 40% shrinkage done in a 40 degree celcius wash cycle. My machine (in Japan) only does cold water so I washed it with some towels to make it matt-up a bit more.

20140614-201345-72825429.jpgWhen I started, I wasn’t sure what kind of decoration I was going to do. I just decided to start and see what happens. I made a piece 38 stitches wide, about 40 rows high and then sewed it up. Pre-felting, the fabric extended 2 cm above my iPhone. Post-felting, it came up 1 cm short. That’s not such a big problem as this is only a proto-type. I fully expected to have to do it more than once. Still, it would have been nice for it to work, first thing.

design ideas for felt case

So even though it was small, I decided to make the prototype anyway. The design I decided on was Estello. Estello is a character I created for photography and designs. Estello has his own blog and even a Facebook page. Please like or follow Estello. Estello always likes likes.

One of my friends said he likes my design sketches as much as he likes my products so I thought I’d post my brainstorming this time. I wanted to do something French-themed even though this wool in from Finland. I sketched out an Eiffel Tower but I couldn’t needle felt it at this size in a way I liked. Somehow the shape reminded me of an umbrella, and it did rain quite a bit on our trip. So umbrella time! I like the idea of the umbrella and the cover being cloudy and revealing a sun on the inside. I still like Estello in the hat and shirt. Maybe another project.

For Estello, I used felting wool I already had (yay for stashbusting!) and needlefelted the Estello design. I hand-painted the fabric. I’m not sure if I like the painting. I prefer the cloud to the sun.

Clip attached to case body

I tried this clip first. I couldn’t do the leather stitching nicely. It’s my first time to do leather. This clip is heavy and looks icky. I got it in the hardware section. I don’t know what it’s called.  I took it off and tried again.

Back of Case

This time I found a flat-ish, light carabiner clip. My stitching was better this time. It looks better but the balance is still off. It’s because the fabric is too, low and not at the top of the phone. I compensated by making the cloud cover more of the phone rather than just being a flip over the top.

Solutions For Next Time:
Make the fabric longer and a couple stitches tighter.
Place the clip on the top of the cover
I upgraded to iPhone 5 so now I have a design problem. The earphone jack is at the bottom not the top as I designed.


Yarn Addiction Thursday: Wrist-warmers in Alpaga Teint

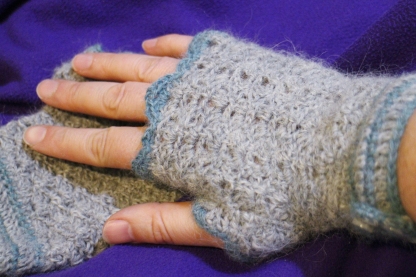
Early Spring was really chilly for my fingers. I had a nice toasty electric blanket for my lap but my fingers got stiff from typing and being cold. My solution? Procrastinate on my writing-work-in-progress by making some wrist-warmers. This project had two-extra bonuses: I could use it for stash busting, and since I had more appointments and commuting time than usual I could feel productive while waiting.

I wanted something warm and fuzzy, yet a little bit lacy. I had made valentine wrist-warmers from the wool I bought at Lil Weasel in Paris. They are super cute, but for a second pair, I wanted something a bit more sophisticated.

half-made wrist warmer
Hanging out at a museum and crocheting while waiting for an appointment.

I had some extra alpaga teint from La Droguerie that I thought would be perfect. Alpaga is a 100% alpaca plied texture wool, fingering weight (4 ply).  In my stash I had some grey and some light aqua blue which made for a subtle combination.

So I had my wool. I needed a pattern. I started looking on ravelry.com for a pattern. Most of what I saw was really cute, but most patterns were long and slouchy. I wanted something fitted, especially around the wrists. Not really finding any, I decided to try to make my own pattern.

I used Crochet Stitches Visual Encyclopedia by Robyn Chachula.  I got the Kindle version so that I could refer to it while on the train.  I crocheted a few swatches of different patterns but settled on the fairy shell. I used a 3.0 hook. I crochet really tight. It’s a problem, but I don’t favor loose stitches so much, either. This will probably change as I mature as a crochet-er (is this the correct word? Seems odd.)

crochet swatch of fairy shell pattern
My swatch of fairy shell

The cuff is made by single crochet in blue and double crochet in the grey, crocheted flat. For the body I added five stitches, joined the ends together then crocheted in the round leaving a gap for the thumb. The thumb was tough to make. Keeping the pattern while expanding and decreasing the stitches was hard. I’m not really satisfied with the thumb, but done is done. The finger-edge trim is  done in a modified fairy shell pattern.

I used old buttons that came with shirts I bought long ago to use up stash. I tried two different ways to fasten the wrist portion. The left hand is a single crochet loop and the right uses three buttons. The three button was necessary because just having the end two buttons allowed the inside edge to poke out. For some reason, the crochet loop doesn’t have anything poking out.

I did really well to use the alpaga I had. Too well. I didn’t have enough to make the second wrist-warmer. I ended up going back to La Droguerie to finish the project. So much for stash-busting. I ended up buying even more yarn! I did manage to restrain myself from buying more buttons, cute and tempting as they were. La Droguerie is such a feast for the eyes and drain on the pocket book.

alpaca-warmers_10

So these wrist-warmers are my second attempt at making my own pattern. I enjoyed the process but endured a lot of stitch ripping and do-overs. At some point, I’m going to try my hand at writing out the pattern. Maybe re-photograph the wrist-warmers, too. It is shockingly hard to photograph your own hand for demos.

If anyone has any great sites or tips on making patterns, particularly for thumb gussets, please share. I’d love to see them.