Nicosui and Harunobu Aihara: The Couple that Felts Together

aihara-yuko-nicosui-needlefelting-fiber-artist-lorionophotography
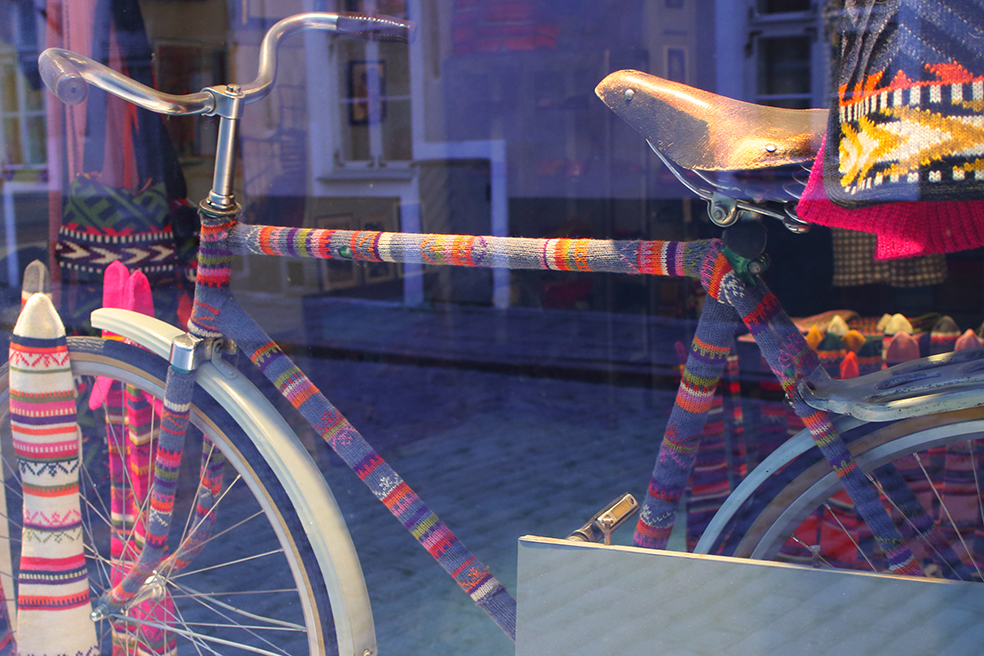
Yuko and Harunobu Aihara felt together. The pair recently had a fiber sculpture exhibition called Ikimono Expo 2 at Gallery Choukou (ギャラリー澄光) near Okusawa station (on the Meguro line) that shows how creative and detailed needle felting can be. The couple started 7 years ago with a small needle felting kit but immediately saw potential for their own designs and started with their own creations almost immediately. One thing that I noticed was the variety of color in the work and I know that they base structure takes a lot of wool. They admit to having a lot of wool roving–two large plastic boxes in fact. For two artists working together and using the same medium, their aesthetic is completely different. And all of the incredible detail (except for Harunobu Aihara’s yarn wrapping), is done with felting needles, not embroidery.

Aihara Yuko uses the artist name Nicosui. Real animals and the animal characters of Grimm’s fairytales inspire her work. She chooses her subjects by how much they intrigue her. Sometimes it is the story, as with the fairytale creatures, but often it is the animal’s face and her desire to try and create a particular shape or feature. She chose the koala because she was interested in recreating the fluffy ears and the shape of the muzzle. She told the most difficult was the giraffe because of the structure. It was surprisingly longer and thinner in the nose than compared to skull.


aihara-yuko-nicosui-needlefelting-fiber-artist-lorionophotography-2While Nicosui’s creations look realistic, she seldom chooses the animal’s natural color. Instead she chooses a color palette that represents what she sees the spirit of the animal: red for the lion, and pink and purple for the feminine nature of the giraffe, green for the koala. She also makes more realistically colored animals in small scale for broaches.

What Nicosui wants people to know about her work:

ぜつめつ動物をなくす (prevent extinction of animals)

Many of the characters she creates are endangered animals. She hopes to inspire the viewer to live in peace with animals and take care of the earth so that people and animals have a healthy place to live.

aihara-harunobu-fiber-artist-needlefelting-portrait-lorionophotography
Aihara-san holds “Gokiburi”


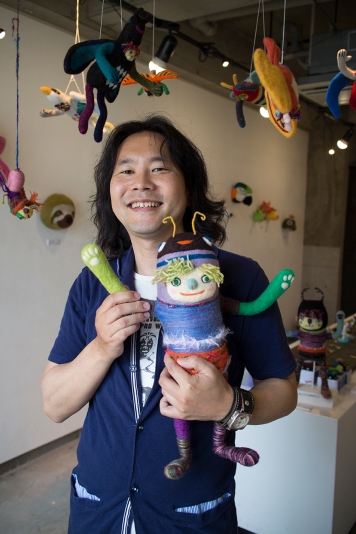
Harunobu Aihara is an illustrator and graphic designer. He is also a bassist in a 70’s music hard rock band. Nicosui’s work has more realism while Aihara’s work is about unique, fantastical characters. His style is whimsical and humorous. He says his style has almost always been like this. This year was the first he tried making insect-inspired creature. He really enjoyed them so he made a lot.

It’s not just Aihara’s aesthetic that is different from Nicosui’s. His work process is also completely different. He says that Nicosui takes a lot of time with each project working slowly to perfect her details while he prefers いきよいでつくる, making with momentum.

While he often starts with a sketch, which he may or may not adhere to. Sometimes he freestyles with wool. The base of his sculptures are wire armatures. He builds dimension over the armature by wrapping wool roving around it, and using felting needles to refine the shape. The color detail is a layer of needle felting, sometimes wrapping with yarn or fabrics depending on the effect he wants


He also made many angels, which also have insect or avian features. He said that they are slightly disguised to look like a bird if a person looked up to see one flying in the sky.


His goal: たのしと平和.  He wants to bring viewers moments of enjoyment where they can feel peace through happiness.

Save

Save

Save

Save

Hand-stitched Piggy Charm

Walking around in Jiyugaoka in December I came across a branch of Hobbyra Hobbyre. This store sells higher end yarns, fabrics (Liberty Cotton mainly) for quilting, sashiko (a Japanese embroidery style) supplies and some small toys. I looked in the window, saw yarn suddenly I needed to increase my stash. I was browsing wool, then my husband found this piggy charm.

I couldn’t resist. To buy pre-made  cost 9000 yen. To get the kit and make your own was around 1500 yen and came with needles. The pig was super cute and it was interested in getting a kit to learn a new technique and maybe design my own stuff later.

The hardest part was the yellow diamonds on the purse. To get those lines with nice even stitching required heavy use of  a stitch ripper. I also had a hat, but it made the piggy charm look way to elderly. But I’ve got the little chain on it to attach to things and it is ready to go out into the wide world—or a jungle.

Piggy Charm in the jungle


A Cup Cosy for All Seasons. Sock Monkey vs. Hello Kitty

20140624-210703-76023558.jpg
Maybe I’m excessively delicate, but I don’t like to hold on to a cup that is burning hot or a cup that is icy cold. I feel guilty when I use the paper cup holders, sleeves, cosies, whatever you want to call them. But I lose stuff easily. The more boring it is, the easier I seem to lose it. Cute and quirky sticks with me a lot better. And I found a solution for my cup woes.

I found this pattern during a visit to Gina Brown’s during Mission Yarnpossible: Calgary. I was looking for something else completely but couldn’t resist this pattern book, Monkey Around by Patons. You can get the cup cozy pattern for free at Paton’s site Yarnspiration.com
but the book has lots of fun patterns.

The sock monkey cup cosy is really easy to make. I finished the first one in a day, including time to run out and buy notions. I din’t enjoy making the ears. They were fast, but… meh for the ears. I also used different yarn than listed in the pattern so this can be a great stash busting pattern. My mom gave me 5 balls of Sirdar Denim tweed DK so I bought some yarn at Gina Brown’s to complement and complete the pattern. I have enough yarn to make a sock monkey cup holder army.

A friend has her birthday coming up and she loved my sock monkey cozy. Since she is a Hello Kitty fan, I adapted the pattern and added a needle felt name tag.
20140624-205821-75501129.jpg

If anyone is interested in the pattern I made for the Hello Kitty face, let me know and I’ll post it.

Hope you enjoy the cup cozies and let me know what you think.

20140624-213146-77506408.jpg

Mission Yarnpossible: Helsinki

So the next Yarnpossible mission in my European adventure was to find some yarn in Helsinki. Thank heavens for ex-pat sites and blogs. If you are travelling to a foreign country, I really recommend checking out some ex-pat sites. Knitmap.com was a great help. I spent a lot of time looking at this world-wide knitting store database. When searching for stores I discovered Riihivilla.com. Riihivilla sells through an online shop  and at Kauppatori Market in Helsinki. It is a family business which produces and dye their own wool and make gorgeous kits. I didn’t go but it is definitely worth mentioning because this shop really represents Finnish yarn and knitting to me.


On January 2nd, I went to Lanka Deli by Novita.  I enjoyed the shop but the women who worked there were polite, they weren’t as chatty as staff at other stores I’ve been to or other Finnish people I met. I think there was a language barrier.

I found a felting wool which I later used to make my  felted iPhone case. The yarn is called Huopanen. It was interesting to work with a wool specifically for felting after knitting. It works up easily and I din’t have problems with splitting the yarn.

20140614-201345-72825533.jpg

I also bought some wool to make some mittens. Florica by Novita is a 5-ply sport weight. It seems similar to the craft-boutique wool I saw in Tallinn. It was a bit softer and I had a chance of ordering more if I liked it. My color choices were inspired by Marimekko designs and Italla tableware, and Dick Bruna’s Miffy. Bruna is one of my favorite illustrators.


Lanka Deli by Novita.
Malminrinne 1 B, Helsinki, Finland 00180 Finland
(09) 673 246

Mission Yarnpossible: Tallinn

Our trip to Tallinn was a complete surprise and totally unplanned. We read about the ferry from Helsinki to Tallinn in a brochure in our hotel room. The Old Town in Tallinn, Estonia is a UNESCO world heritage site for its architecture dating back to the 13th century. Since it was January 1st and almost everything in Helsinki was closed, we figured we might as well take the trip. It turns out that Old Town had lots of stores open and a Christmas Market in the Square. I was also keen to go because when I think of Estonia, I think of knitting

estonian_mitten
I made these 4 years ago and gave them to a friend.

I love multi-colored Estonian patterns. I’ve made a couple pairs of mittens using Scandanavian patterns. I discovered this through The Mitten Book: Traditional Patterns from Gotland, by Ingrid Gottfridson. My multi-colored knitting suffers from tension issues but I do it anyway. I’m sure there are differences in the colorwork knitting styles between Finland, Sweden and Estonia but I’m not clear what those might be. I was hopeful that I could find some yarn or some nice pieces to take home.

One of the first things I saw was a yarn-bombed bike in a window! Very encouraging! I love looking at yarn-bombed objects. How they do it is a mystery to me. One I intend to continue to enjoy as a mystery.

Yarn bomb that bike!

I found great looking at a couple of folk-art boutiques in Old Town. The yarn was really interesting but it was thin which means lots of work to knit; and coarse, which means really itchy-scratchy products. I can see how this wool would be great for blocking snow out, but I don’t like scratchy. But there are many wool-based souvenirs in Tallinn’s Old Town. My husband got a sweater, I bought a balaclava hat for a friend, and a pair felted mouse slippers for myself. The amount of felted work for sale was almost staggering.
Best Slippers Ever!


rattirattoI completely adore my mouse slippers. I call them Ratti and Ratto (sort of playing on the Finnish word for rat or mouse, even though they are Estonian). They were 20 euros which was on the cheap end for what was available. They have suede soles. The wool looks scratchy but the pink insides are very soft on the feet. The pink insides aren’t attached very well and one eye fell off on the first day. But they are still fun. I have plans to make Ratti a pi-rat by putting on a black eye patch in place of another eye.

Felting an iPhone Case

Estello's Felted Phone CaseThis felted iPhone cover is one of the things I made with the yarn I bought in Helsinki. Instead of the traditional souvenir, I thought I’d buy wool and make my own. I already made wrist-warmers from wool I bought from Lil Weasel in Paris. This wool is called Huopanen by Novita. I bought it at A store in Helsinki. It’s felting wool. It’s a super-bulky plied texture, suitable for 8-10 mm needlesIt was fairly easy to knit up but I wasn’t sure how it was going to felt and shrink.

It didn’t occur to me until yesterday to look Novita up on Ravelry. I learned that Huopanen has  about 40% shrinkage done in a 40 degree celcius wash cycle. My machine (in Japan) only does cold water so I washed it with some towels to make it matt-up a bit more.

20140614-201345-72825429.jpgWhen I started, I wasn’t sure what kind of decoration I was going to do. I just decided to start and see what happens. I made a piece 38 stitches wide, about 40 rows high and then sewed it up. Pre-felting, the fabric extended 2 cm above my iPhone. Post-felting, it came up 1 cm short. That’s not such a big problem as this is only a proto-type. I fully expected to have to do it more than once. Still, it would have been nice for it to work, first thing.

design ideas for felt case

So even though it was small, I decided to make the prototype anyway. The design I decided on was Estello. Estello is a character I created for photography and designs. Estello has his own blog and even a Facebook page. Please like or follow Estello. Estello always likes likes.

One of my friends said he likes my design sketches as much as he likes my products so I thought I’d post my brainstorming this time. I wanted to do something French-themed even though this wool in from Finland. I sketched out an Eiffel Tower but I couldn’t needle felt it at this size in a way I liked. Somehow the shape reminded me of an umbrella, and it did rain quite a bit on our trip. So umbrella time! I like the idea of the umbrella and the cover being cloudy and revealing a sun on the inside. I still like Estello in the hat and shirt. Maybe another project.

For Estello, I used felting wool I already had (yay for stashbusting!) and needlefelted the Estello design. I hand-painted the fabric. I’m not sure if I like the painting. I prefer the cloud to the sun.

Clip attached to case body

I tried this clip first. I couldn’t do the leather stitching nicely. It’s my first time to do leather. This clip is heavy and looks icky. I got it in the hardware section. I don’t know what it’s called.  I took it off and tried again.

Back of Case

This time I found a flat-ish, light carabiner clip. My stitching was better this time. It looks better but the balance is still off. It’s because the fabric is too, low and not at the top of the phone. I compensated by making the cloud cover more of the phone rather than just being a flip over the top.

Solutions For Next Time:
Make the fabric longer and a couple stitches tighter.
Place the clip on the top of the cover
I upgraded to iPhone 5 so now I have a design problem. The earphone jack is at the bottom not the top as I designed.


Froggio Froggeddabaddit

Froggio Froggeddabaddit is based on a La Drougerie pattern with a few modifications. The pattern is very similar to the one I used for Kitijiro Nekowski so it was really easy to make this one up.

20130311-170500.jpg

The first modificiation is in the feet. Sewing up the fabric for the footpads really annoyed me. It was the least fun part of the cats and Froggio so I made my own needle felt footpads. I put the number 2 and 9 on the feet because the 29th is my birthday. If you notice the back paws, the dice show two and a nine as well.

The second modification is the addition of a mouth. My favorite part of a frog is that the tongue can lash put and nab an unsuspecting bug. And the fact that the long tongue fits in the mouth? Any frog of mine had go have a tongue that could go in and out.

I had some scrap pink fabric and made a little sack. I made a needle felt tongue, sewed it into the mouth then sewed the sack inside the frog. The tongue rolls up and fits inside the little sack or can stick out and be long. I toyed with the idea of putting Velcro on the tongue but since Froggio is made of easily snaggable wool, I nixed the idea.

20130311-165117.jpg

20130311-165130.jpg

20130311-165145.jpg

I still made some little felt bugs for him to eat. There is a little pocket for the belly where his dinner goes.

20130311-170355.jpg
They ended up being a little larger than I originally envisioned. They just became fun to make.

These are two bugs I needle felted for Froggio.

20130311-171348.jpg

Kitijiro Nekowski’s Cousins: cats with a fish in a bag

20130114-193953.jpg

These are the cats I knitted my my nieces and nephew. They are the same pattern as Kitijio Nekowski, from La Droguerie. When I finished the cats, I felt that they needed a little something more so I gave them accessories. What does the modern cat want? Fish! And little bags to carry them in.

The felted fish (I love that alliteration) are my design. I’m really happy about them because they look exactly like my pencil sketches. What surprised me is the feedback that the fish are more interesting and popular than the cats.

I made little satchel bags out of mandarin orange nets and bias tape. In theory, it should have been easy. Making them was more challenging because the plastic net is really stretchy and hard to keep it in place with the bias tape. Plus it would have been easy if I hadn’t threaded the sewing machine wrong. This was the second time for me to use it so the learning curve hasn’t been mastered yet.

To complete the gift I made little sleeping bags for the cats. I sewed the initial of my nieces and nephew on the outside of the bag to mark who got which cat. The sleeping bags were another part where theory didn’t live up to practice. By the time I made the third bag, I had figured out the machine and felt confident enough to rip out the seams of the first bag and do it over.

The photos were done at my local post office before I sent them off. I almost forgot to take any photos in my rush to get them to Canada I’m time for Christmas. Happy to say, the package made it in time.

20130114-194026.jpg

20130114-194057.jpg

Snowmen Fight: Samurai vs Ninja. Get Your Winter War Mittens Here!I A Post in 2 Parts. Part the Second.

recycled sweater into mittens
Recycled sweater with my own felted design. Fighting snowmen. Ninja vs. Samurai

Today, I finish the article of the making of the Fuyu no Jin Mittens. As I wrote in the previous post Fuyu no Jin means a winter war in Japanese. Traditionally, it’s army against army in winter but my mittens are going small scale. Yes, I’m taking a lot of liberties.

The previous post was about the designing process. This is about the construction process.

Materials

100% wool sweater to be recycled
Felting wool in 5 colors

  • White or ivory
  • Grey
  • Black
  • Blue
  • Red

Embroidery thread
4 tiny black beads for eyes
Needle Felting Gear

  • Felting Needle
  • Sponge (for underneath the needle and project
  • Liquid soap
  • Water (warm to hot)

Sewing Machine or Hand Needle and Thread
Needle for sewing details
design for felting
Mitten Template (made from tracing hand or a template you like)

Pattern to Sewing
1.  Make a template to trace out the mittens.

  • I searched the Internet for a nice template but never really found one. It seems like thumbs are the trickiest part. This time I added thumbs separately.  I ended up tracing the outline of my hand with a 1 cm allowance I wanted tighter mittens rather than loose and the sweater I was recycling has a lot of give.

2. Trace or pin the template to the sweater and cut it out. I traced one side then flipped the template for the back reverse side then traced, cutting the body of the mitten as one piece and one seam. Thumbs were not part of this template. I added thumbs by draping material over my thumb.

  • If I had to do it again I would trace the whole hand, thumb included then just flip the template. I did that with a second pair. Construction was easier and it didn’t feel different to wear.

3. Sew the mittens up. I hand-sewed these and it took a couple hours for each mitt. I used a sewing machine on a second pair and it went much faster.

  • I first tried to felt the seams. That didn’t go well. It might have worked if I’d allowed more than a .5cm. The seam felting was wasted time.

Adding the Design
1.  Put the mittens on the hand and mark out the part the design will fit into.

2.  Trace the design onto the mitten.

  • I redrew the design from the sketch on the mitt rather than trace. I used disappearing fabric marker which became a bit troublesome. As time passed, I had to redraw on the mitten. This happened several times so the design morphed a bit. Rather than getting upset, I just consider this transition part of the process.

3.  Put the sponge inside the mitten and under where you will needle felt.

4.  Needle felt the design. I followed the instructions from this website for how to felt a design onto a surface. I think their instructions were good. Rather than repeating them here, I recommend you check out the link.

Felting
1.   Hand-wash the design using hot water and liquid soap. Gently rub the design to felt the fibers. You might want to wear rubber gloves if the water is hot but still be careful about burns.

2.  Roll the mittens the mittens in a towel and allow to dry flat. Be gentle!

3.  Check the design when dry and use the felting needle on loose parts or tidy up the design.

4. Repeat steps 1 and 2 if needed.

5.  If the design is secure and you are happy with it embroider embellishments.
On these mittens I embroidered a mouth and sewed on two onyx beads for eyes.

Care
These mittens might survive a machine wash, though I wouldn’t care to test it. I recommend gentle hand-washing and drying flat.

Use
I’ve used the mittens for daily wear and bike rides and they worked well.  When I made felted seams, the seams opened up during a bike ride. So far, the hand-sewing has been durable and no problems with the designs.

If you have any suggestions of feedback about making the design or construction process easier, I’d love to hear.

Thanks for taking the time to read the article. Hope you enjoyed the two posts.

Snowmen Fight: Samurai vs Ninja. Get Your Winter War Mittens Here!I A Post in 2 Parts. Part the First

recycled sweater into mittens
Recycled sweater with my own felted design. Fighting snowmen. Ninja vs. Samurai

Time: 10 hours (depending on skill and gear)

Materials

100% wool sweater to be recycled
Mitten Template (made from tracing hand)
Felting wool in 5 colors
Embroidery thread
4 tiny black beads for eyes
Needle Felting Gear
Sewing Machine (or Needle) and Thread
Needle for sewing details
design for felting
(for a more complete materials list, check out part 2)

Process

Brainstorming

I attended a local Stitch and Bitch but I hadn’t any current, portable projects to work on. I showed up because it’s a nice crowd and I decided I’d work on an idea of something to make. I had an old cashmere sweater that was just too short for me and thought I’d recycle it. I’d recently seen some needle felting and it occurred to me that I could felt a design onto recycled mittens. I had no idea really what I wanted to sketch so I just let my pencil wander.

I was a bit surprised that this is where I ended up. I love to draw snowmen (in Japanese they are called yukidaruma). I wanted the snowman to have a little bit of character and something Japanese-styled. All I can say about the ninja is that I must have seen something on TV around that time. The way I drew the mask is a little bit like the female ninja character, Nezumi Onna (mouse woman) on a jidai-geki.

The snowflake above the head was supposed to be a shuriken/snowflake. I loved the idea but I quickly gave up the shuriken idea as being too difficult to for felting and the size.

I’m not sure how authentic nunchuks are for Japan and ninja.  I don’t think they are very authentic but they were fun and easy to do, so I used them.

So I had one hand done, but didn’t want to have ninja vs. ninja. So a samurai was the next logical choice.

I had this idea of them fighting on a bridge with a castle in the background and snow falling. Then I had a reality check. This was my first needle-felting design project and I wanted it to looks good and be simple. I still like the idea so I might actually do this as a drawing someday.

I was really happy with how I got this snowman to appear to have more dynamic movement but still be round and weighty. His chomage (the samurai hairstyle) at this point looks ok. The clothes are suggestive of Japanese men’s kimono rather than representative.

That’s a Fun Sketch, but Can You Felt It?

So I had two simple designs that I really liked. Before I started to make the mittens, I wanted to make sure that I could felt the design well enough to satisfy me. This was my first time to felt a 2-D pattern, not to mention one of my own design. I didn’t want to go through the work of making mittens only to mess them up with shoddy work. I needed practice. In all honesty, the project languished at this stage for a few months.

I started with the ninja.

I did a bit of research and found this site for felting designs with a felting needle. I checked out a lot of sites but this was the easiest for me to understand.

Felting test #1. Ninja

I cut out a strip from the sweater and drew the design on the wool. It’s not easy to do a good sketch with a fabric marker on wool. I made an underbody of the snowman before felting his clothes on. I don’t know if I would do it that way again. I didn’t with the samurai and that was easier and less bulky.

When I finished I was pretty happy with it. Since I liked it quite a bit and didn’t want to waste the effort, I made it into a bookmark. The pink border in needled felted from some felting wool I had so that the sweater background wouldn’t unravel.


Next up was the samurai.

Having learned my lesson from the ninja (taken out of context, that sounds much more interesting than needle-felting), I didn’t put an underbody and felt clothes on top. The effect is a bit different. It gives the work a bit of a pieced effect, more pronounced lines between the colors. Sometimes it made a bit more of a gap than I would like but maybe that’s just the medium and I have to live with it.

Felting Test #2: Samurai

This time I didn’t make a bookmark. The piece I cut was just large enough to test my design. I felt confident with the felting technique after the ninja. I wanted to practice the samurai before doing the mitten. Now I regret not taking a bigger piece to make a bookmark of the samurai. I’ll maybe felt it onto a larger piece someday.

Which brings us to the end of the design and practice portion of this entry. Check out part 2 on Friday.
If you have any suggestions of feedback about making the design process easier, I’d love to hear.

Thanks for taking the time to read the article. Hope you enjoyed it.