Nicosui and Harunobu Aihara: The Couple that Felts Together

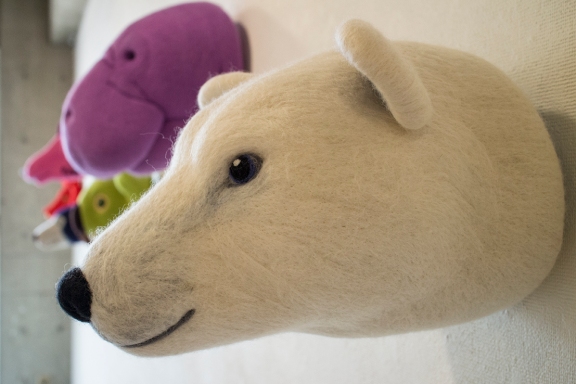
aihara-yuko-nicosui-needlefelting-fiber-artist-lorionophotographyYuko and Harunobu Aihara felt together. The pair recently had a fiber sculpture exhibition called Ikimono Expo 2 at Gallery Choukou (ギャラリー澄光) near Okusawa station (on the Meguro line) that shows how creative and detailed needle felting can be. The couple started 7 years ago with a small needle felting kit but immediately saw potential for their own designs and started with their own creations almost immediately. One thing that I noticed was the variety of color in the work and I know that they base structure takes a lot of wool. They admit to having a lot of wool roving–two large plastic boxes in fact. For two artists working together and using the same medium, their aesthetic is completely different. And all of the incredible detail (except for Harunobu Aihara’s yarn wrapping), is done with felting needles, not embroidery.

Aihara Yuko uses the artist name Nicosui. Real animals and the animal characters of Grimm’s fairytales inspire her work. She chooses her subjects by how much they intrigue her. Sometimes it is the story, as with the fairytale creatures, but often it is the animal’s face and her desire to try and create a particular shape or feature. She chose the koala because she was interested in recreating the fluffy ears and the shape of the muzzle. She told the most difficult was the giraffe because of the structure. It was surprisingly longer and thinner in the nose than compared to skull.


aihara-yuko-nicosui-needlefelting-fiber-artist-lorionophotography-2While Nicosui’s creations look realistic, she seldom chooses the animal’s natural color. Instead she chooses a color palette that represents what she sees the spirit of the animal: red for the lion, and pink and purple for the feminine nature of the giraffe, green for the koala. She also makes more realistically colored animals in small scale for broaches.

What Nicosui wants people to know about her work:

ぜつめつ動物をなくす (prevent extinction of animals)

Many of the characters she creates are endangered animals. She hopes to inspire the viewer to live in peace with animals and take care of the earth so that people and animals have a healthy place to live.
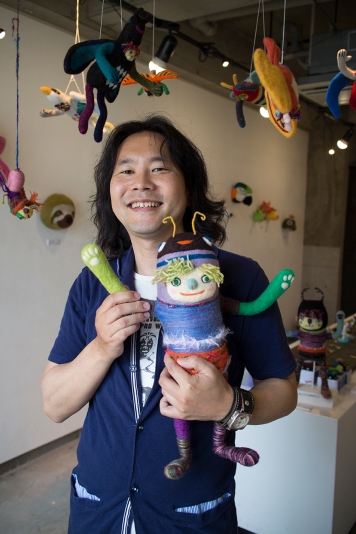
aihara-harunobu-fiber-artist-needlefelting-portrait-lorionophotography
Aihara-san holds “Gokiburi”


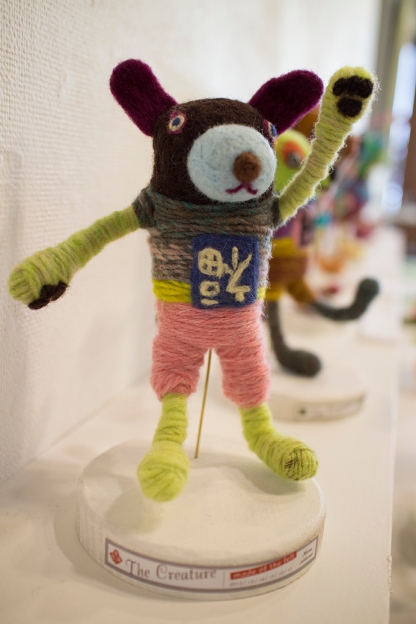
Harunobu Aihara is an illustrator and graphic designer. He is also a bassist in a 70’s music hard rock band. Nicosui’s work has more realism while Aihara’s work is about unique, fantastical characters. His style is whimsical and humorous. He says his style has almost always been like this. This year was the first he tried making insect-inspired creature. He really enjoyed them so he made a lot.

It’s not just Aihara’s aesthetic that is different from Nicosui’s. His work process is also completely different. He says that Nicosui takes a lot of time with each project working slowly to perfect her details while he prefers いきよいでつくる, making with momentum.

While he often starts with a sketch, which he may or may not adhere to. Sometimes he freestyles with wool. The base of his sculptures are wire armatures. He builds dimension over the armature by wrapping wool roving around it, and using felting needles to refine the shape. The color detail is a layer of needle felting, sometimes wrapping with yarn or fabrics depending on the effect he wants


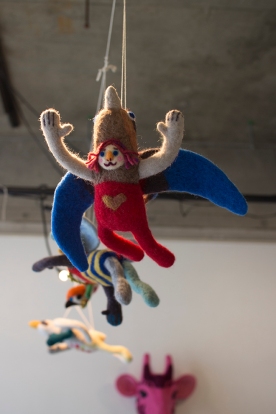
He also made many angels, which also have insect or avian features. He said that they are slightly disguised to look like a bird if a person looked up to see one flying in the sky.


His goal: たのしと平和.  He wants to bring viewers moments of enjoyment where they can feel peace through happiness.

Save

Save

Save

Save

Happy New Year Wishes for You!

  
Best Wishes for you this year. I wish you all the best in all you endeavors and adventures.

Also wishing you lots of monkeys to take over your bad habits from you!

Thanks for reading the Spendy Pencil and here’s to another year of sharing and learning from each other.

I’ve also gotten rid of Candy Crush games from my phone so that’s one goal done. Thanks Mock Sonkey the Sock Monkey!

Talking About Art

In the middle of writing a blog post reflecting on everything going on this autumn, I end up writing about art and and the way we talk about it. It’s still a work in progress but I thought I would throw out some questions before I finish it.

Ikamura Gessozaburo wants to talk about art.

I know how I feel about art and talking about it, but what about you good people?

  1. How do you feel about art?
  2. Do you feel comfortable about talking about it?
  3. Do you have any notions about what you can or can’t say about it?
  4. Do you think there are requirements or that there should be?
  5. Do you have any stereotypes or specific images about art discourse?
  6. What kind of experiences have you had?

I’m interested in your opinions. Please share them. Don’t worry about being right or wrong. Just be honest. I look forward to hearing from you.

Hand-stitched Piggy Charm

Walking around in Jiyugaoka in December I came across a branch of Hobbyra Hobbyre. This store sells higher end yarns, fabrics (Liberty Cotton mainly) for quilting, sashiko (a Japanese embroidery style) supplies and some small toys. I looked in the window, saw yarn suddenly I needed to increase my stash. I was browsing wool, then my husband found this piggy charm.

I couldn’t resist. To buy pre-made  cost 9000 yen. To get the kit and make your own was around 1500 yen and came with needles. The pig was super cute and it was interested in getting a kit to learn a new technique and maybe design my own stuff later.

The hardest part was the yellow diamonds on the purse. To get those lines with nice even stitching required heavy use of  a stitch ripper. I also had a hat, but it made the piggy charm look way to elderly. But I’ve got the little chain on it to attach to things and it is ready to go out into the wide world—or a jungle.

Piggy Charm in the jungle


Quilted Octopus Sling Bag

Instead of Yarn Addiction Thursday, I thought I’d go to a different fiber media—quilting. I’d been wanting to do a project with my mom for a long time and the timing never worked out and then suddenly it did.

My parents  drove down to Las Vegas to meet up with my husband and I. My husband was there for work and my parents were doing the snowbird thing. I brought my camera, my dad brought his golf clubs and my mom brought her sewing machine. I planned to do some photography with a friend, my mom planned to do some quilting during her snowbird sojurn. My mom is an excellent quilter. She’d probably say she’s still a neophyte, but her works looks great and she is very meticulous. Being meticulous is a great habit in a quilter I think.

While hanging out with my mom she wanted to go to a quilting store. Suddenly, I had the idea to make myself a quick little bag.  And I could do a project with my mom! I was definitely more excited about this than her. I planned to just get some fabric, fold it over, sew up the sides, add a strap and voila! A bag to take my workout clothes to the gym.

But, as my friend Deanna of StudioDeanna says about my work, why would I do anything simple when I could over-engineer it? She should know. As my crochet sensei, she’s seen me over complicate lots of stuff.Because soon after saying I wanted to make a ten minute bag, I had the idea to make an octopus quilted bag.

This is where my mom and I diverge on things. I’m not a quilter but I understand the basics. I have basic sewing skills. But I do read quilting and craft magazines and blogs. I had recently read a blog post Sewing: Snowman Quilted Pillow Cover at www.craftpassion.com.  The pillow was a trapunto technique. I was pretty sure that I could make my own bag using this as inspiration as long as I kept things simple and used fusible web. My mom insisted that I needed a pattern. She also had a different idea about how I would do the applique.

We compromised by having me describe my idea to an employee at the quilting store and discussing it’s feasibility. If the clerk said it would work then I’d do it. If the clerk laughed her head off, the bag was off.

We went to Quiltique in Henderson, NV. I found the staff really helpful and the fabric selection was gorgeous! I was immediately drawn to a lovely selection of batiks. When I described my idea, showed my sketch and told the her how I planned to construct my bag I finished with, “Will it work?” She gave me a puzzled look and said, “Why wouldn’t it?”
I turned to my mom and gave an enthusiastic thumbs up and my mom just laughed and rolled her eyes.

So… this little bag that I originally planned to make in twenty minutes for $15 max $70 project over two several days.

20150218-222031-80431136.jpgAt first I over-designed. I imagined a scene with coral and sand and the octopus peeking out, maybe playing dice. It didn’t take too long to realize that was too cartoonish and way too much work. I edited it back to just the octopus.  The design is the same on both sides and the head joins along one side so when the bag is full you get a 3-d head view. The inside of the bag is a sandy-colored batik fabric. The pattern of the octopus and the waves outline with the colored thread.

20150218-222030-80430539.jpgI’m pretty happy with it and it looks like I imagined. I originally planned to have two colors for the water lines and have more of them and also to sew some bubbles. I opted for finishing instead of making more work. I’m toying with the idea of adding some very light fabric paint with a stencil brush to give the eye a 3-D effect. Mom says that the eye will pop out more once the bag has been washed. We’ll see.

The hardest part was tucking the loose threads into the work. My mom introduced me to the self-threading needle. A-Mazing. My eyes are changing so it took me five minutes to thread a needle for a thirty second job, multiplied by a hundred loose threads. Oy. The self-threading needle meant I could thread a needle in two seconds.

My other nit-pick are the overlapping tentacles. They aren’t what I intended. They need a bit more volume. If I had to make some changes, I’d fix the overlapping tentacle by quilting it and putting a little washer in the end to weight it down. I’d also finish  the inside edges by covering them with bias tape.

Thanks for helping me make this bag mom!

Yarn Addiction Thursday: fluffy yet sticky

I received this yarn for Christmas. It is a mohair acrylic blend called Scirocco. This wool has a tweed look, mostly charcoal but hints of green and flecks of white. The string is not so thick but it requires larger needles or hooks becuase that stuff is fuzzy and sticky.

This fuzziness would be nice for a snuggly lace shawl so crocheted this yarn into a wrap for a friend moving from Tokyo to Hawaii.

I made the piece about 10 cm longer than it needed to be. I had no pattern  for the whole work except for the lace stitch: Berry Lace from Crochet Stitches Visual Encylopedia (Kindle) by Robin Chachula. I’m using a 7mm crochet hook. I can’t imagine crocheting this fiber tightly. I like tight, defined stitches this yarn is too sticky for that. I’m learning to love loose stitches. I’m also learning how to appreciate small errors for their “charm” since it’s almost impossible to pull out mistakes. Pulling the yarn back through the loop feels like crocheting with velcro.

Luckily the pattern built up quickly and it was fun to make… when I didn’t have to fix a mistake.

20150218-224302-81782133.jpg

I like how the openness of the lace allows the allows the fabric to display its fuzzy glory. I think it will be a nice balance for cool nights in Hawaii. It was also a nice feeling to see a gift made into another gift.


NOTE: I originally wrote this post year ago and just found it among my drafts. Thought I’d post it anyway.


App Review of StitchSketch LE. Designing Your Own Patterns Is Easier than Ever!

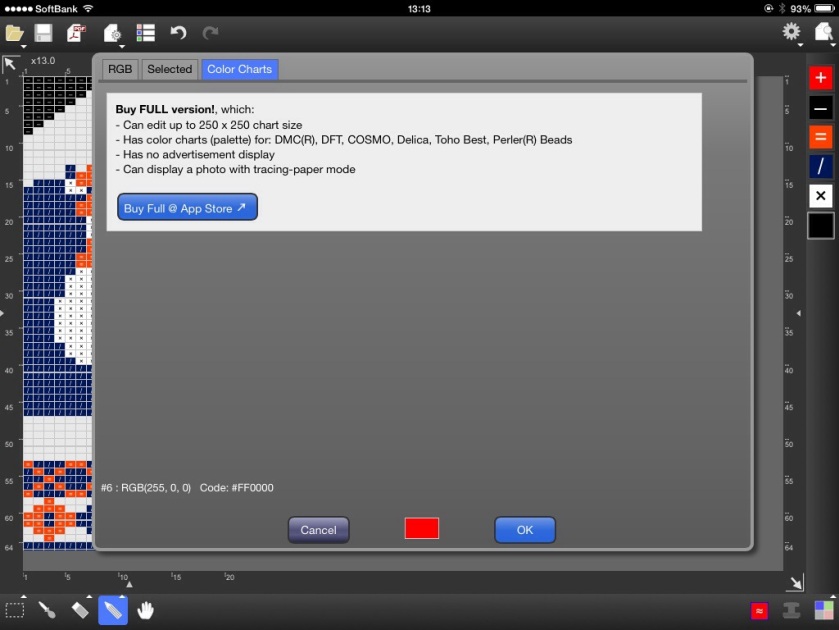
For today’s edition of Yarn Addiction Thursday, I’m reviewing With StitchSketch LE. You can create your own knit, cross-stitch, beadwork designs, or pixel art on your iPad or iPhone with ease.

In the past, if you wanted to design a knitting pattern, you  needed graph paper or to draw out your pattern. Each block got its own color, just like pixel art. If you were doing it freehand, no worries. A photo was a lot tougher.  It was tough to copy a photo onto graph paper, so you could use a light table or transparancy. Not convenient but doable.

So all is good, until you knit out your design and find that the gauge of your yarn makes a unit block of the design more rectangular than square. Your end result ends up looking stretched if the stitch is more upright rectangular and squashed if the stitch was wider.

How to make sure your design doesn’t go wonky? One solution was to find knitting graph paper with different gauge. I didn’t even know that existed until recently. Or you could use an Excel spreadsheet to make your graph paper by adjusting the column and row sizes according to gauge. So all that work and you still need to get your image on the paper. Yikes.

StitchSketch LE makes things  a lot easier. Use your iPad or your iPhone to create wherever you are.

20141113-132835-48515356.jpg1. You select your medium (stitching, knitting, beading, pixel art) which will have symbols or colors depending on your choice.
2. Input the size of the work and the gauge of the yarn
3. Create your image. Draw in the app or import.


4. Save the work
You can save work in the app gallery, your camera roll or generate a PDF. Outside the app gallery, saving as a PDF gets you the maximum amount of information. Saving to your camera roll gets you a chart but no row counts or color info.
20141113-132834-48514796.jpg
5. Generate a PDF.
Check your settings carefully. You might save without the graph lines which makes it very difficult to use. But don’t close this PDF. You need to click the icon on the top right to move the generated PDF into another app to save it or send it. By doing this you get a file row counts and a list of colors in RGB and hexadecimal (for coding). If you buy the full app, you get color references for the brands they use.

I drew the image below in the app. I posted some versions using different media available in StitchSketchLE. I wonder if one could do pixel art for Minecraft in this app?

20141113-202951-73791129.jpg
Some examples of stitch symbols

For knitters who design with stitches more than color
There is also a selection for knitting symbols. I don’t do a lot of knitting with stitch symbols so I’m not familiar with the meanings and the effects. I played with the symbols to show some of them. I’m pretty sure this would not actually make anything.

Some tips
1. This is basically pixel art so the finer your gauge, the more refined your design will look.
2. Test knit a swatch and count your rows and stitches then enter: this way you can be sure your design doesn’t suffer from stretch or squashiness

Conclusion: 5 Stars
I really like the app on my iPad. It removes the grunt work (finding paper, creating a graph, transferring the image to paper) from making a design and allows you to focus on making your vision a reality. I downloaded the free version but haven’t upgraded to the full version. Currently, the LE version fills all my needs very well. I find $6.99 a bit spendy for the full version, but the tracing paper mode does entice me. If I did complicated color work or made kits for people, I would definitely get the full version so I could get a color list of manufacturers’ flosses or beads.

StitchSketch LE by Keiji Ikuta is a free app for the basic and $6.99 for full app.

20141113-132835-48515064.jpg

Yarn Addiction Thursday: Palla, my Finnish Owl.

A while ago on my Yarnspiration post, I posted about the Finnish wool I bought at Lanka Deli by Novita I had originally intended to make mittens but I have a multitude of mittens. What I didn’t have was a stuffed owl. I’m really inspired by the Estonian toy animals in Kiri Kari by Anu Raud and Anu Kotli. I couldn’t find a copy of the book to buy so used them as an inspiration.

I created using an app called StitchSketchLE (look for my review on that next week!). It’s not the most creative design but it was good for a test. I made some pieces that were ok. I find color stranded knitting really hard, especially when I add a third color.

owl_piecesI decided the test pieces would be a good base for my new owl. I originally wanted to just make a flat toy but I get caught up in the challenge of adding form to a design. I ended up adding side pieces and a bottom to give it more volume.  I picked up stitches from the ends and kept knitting from one end to form the tail and the base and the other to make the head.

I used double pointed needles to make the beak and the talons and needle felted the eyes.

And here is the end result:

20141031-124954-46194208.jpg

The Finnish word for owl is pöllö but umlauts are hard to type and plain pollo is Spanish for chicken–not the effect I’m going for. If I were to spell it the way I heard it on Google translate, I get Palla, so Palla it is. One of my friends asked me if there was a connection to Pallas Athena, so yay for coincidence.

Yarn Addiction Thursday: All About the Learning

Mock SUnkey wants to be in charge of writing this post. I told him, "No!"
Mock SUnkey wants to be in charge of writing this post. I told him, “No!”

I missed a couple yarn addiction Thursdays due to my book making frenzy for the Tokyo Art Book Fair. I actually have had no time to be addicted to yarn. And now that I’m in book making mode, I’m not really keen to get back to fibers. There are two reasons for this. I do not want to spend more money. I want to use my fiber stash but that means experimenting. The second is that I have a number of other projects to complete so that means I don’t have time to experiment.

I did do some thinking about what I could do with my stash and I realized I had some knowledge gaps that prevented me from designing effectively.

So today’s post is a list of yarn-y things I want to learn.

Understanding yarn weights and
wraps per inch.
This is a big gap in my understanding of yarn as a textile. I need to know more about how this affects the results of my designs and buying effectively.
 Estimating how much yarn I need.  Relates to the problem above and below.
How to design a pattern for a sweater. Understanding drape and fit. It’s such a huge thing to learn but I’m interested.
 How to piece things together.  I get the concept of blocking, but my sewing is kind of rubbish. I want to know more than one way to join pieces.
How to do 3 color knitting without getting a weird pull on the stitch I can do a great job with 2 colors. 3? Forget about it.
How to design and knit shapes to make plushies. I think this is a great way to use up stash and I love creating toys.
Finding or making more stash busting patterns  My stash busting always ends up making me buy more yarn. SOooooo not the point.

So this is my list. It is rather huge but I think it is a good point to guide me for the next 6 months or so.

If you have any good tips, good sites or some suggestions for other things I need to learn, please let me know in the comments. I’d love some help on this.

Happy stitching everyone.

Mock SUnkey is ready to go yarn shopping.

Note: Mock Sunkey is made from a kit I bought in Tokyo that included the socks. I did not knit him.

The Days After the Art Book (af)Fair. Tokyo Art Book Fair 2014 Review

The 2014 Tokyo Art Book Fair (TABF) has come and gone. It took a lot of work to get ready for it, and it was an intense three days but I enjoyed all of it. Now I just have to sort through the leftovers in n my studio from my book making frenzy.

20140925-000242-162096.jpgA big thank you to every one who visited the Art Byte Critique Group table (H-05), we enjoyed talking to everyone who stopped by. Special thanks to those who purchased some of our work. We ‘re thrilled because we know that there were so many wonderful choices available to you.

To the other TABF contributers and Zinesmate staff, thanks for the community feeling and your hard work. I thought everything ran really smoothly and every contributer ‘s work looked amazing. It was fun to be counted amongst you.

Finally, Art Byte Critique Group, thanks for making the process so efficient and fun. I’m lucky to be a part of this group. It’s inspiring to see what members are up to and the feedback you give on my own work is invaluable.

20140925-000243-163101.jpgWhat Would I Do Differently?
Put prices on things immediately and have cuter price tags. I didn’t want to be pushy by having prices, but I soon realized when I was browsing myself that a price was one of the first things I looked for.

Put a muslin sheet over our work after the day is done. One fellow artist had several books go missing.  And while that could have happened while we were at the booth and the cloth doesn’t lock anything down, I think covering the table gives that sales-are-done-for-the-day feeling and one layer against temptation. I think people at the Book Fair are generally pretty honest.

Have a display rack for photos. It would be great if I could find a small v-shaped poster holder. The photos on the back wall were hard to access and I didn’t have a lot of stock. I’d like people to be able to look more closely at them.

Longer lead time on production. I had my proto-types for the application, but didn’t start producing in earnest until I learned we got accepted and got a table. But not knowing for sure if you get a spot and spending money on production just in case seems like a bad idea.

What Would I Do the Same?
The whole experience! It was great.

Work with Art Byte Critique. I think it is great to share a table with people. I could easily see being overwhelmed and a bit lonely if I were to do this alone.

More Estello! I got a lot  of great feedback on this project. I was a bit hesitant about how Estello would be received  so I made some very simple zines and some A4 posters. While the zines looked good and suited the casual style of Estello, I think I could get something a little better quality with a lower price point if I have a longer production time and spend a bit more.

Talk to people! I got a chance to interview some people at the book fair and to make some contacts. I also got to watch how people perceived my work. So this makes it a bit more useful as a testing ground for new ideas.

Trends
Fellow blogger, Universo Tokyo, asked me if I noticed any trends in the types of  work available this year. This is a tough question. I only attended for a short hour at the end last year, so many things may have already sold.  Like last year, there was a huge variety in the offerings, from high-level professionally done photography coffee table books, to stapled editions of zines. I feel like there were more zines and more hand-made books.

I think another trend was looking instead of buying. I have no idea how this compares to last year. I saw lots of people buying supplies, but proportionally less people buying books and maybe looking around for ideas. Goodness knows there was so much creativity in the building that the urge to start making something really built up.

If you attended, what was your impression of the Art Book Fair? Did you notice any trends?

I did buy a few books…